Wednesday, 24 March 2010
Taking a short break from a course in writing to post about it
Treat your writing like a game of dominoes. When playing dominoes if the first tile placed is a 5-6 the second tile needs to contain either a five or a six spot side, which is placed up against the matching side of the first tile. This approach is also useful in writing. The first sentence in a paragraph introduces the topic, and the next sentence contains a word or words which link back to the first sentence and then adds additional information on that topic. Each subsequent sentence in the paragraph ideally contains a word or phrase which links it back to the sentence which immediately precedes it.
Likewise each paragraph, which by their very nature, often introduce new topics should contain something which links back to what has already been written in addition to providing new information. (Sometimes the “link” can be a contrast such as “However,…”.
This tool alone can make a huge difference. Before the class began we were assigned the task of writing a “200-word abstract describing your current research project. The abstract should be concrete, but simple enough to be understood by researchers not only in your own field but also adjoining fields (i.e. researchers in physics, chemistry, etc.)”. Yesterday afternoon we broke into pairs to evaluate these abstracts. One of the two I read contained ten sentences in four paragraphs. In looking over it I noticed that it didn’t obey the rules of the domino game. Therefore I searched each sentence to discover which ones were related. My suggestion to the author consisted of re-arranging his thoughts. I numbered each of his sentences (1-10) and assigned letters (A-G) to the new locations for the sentences which I felt would improve the flow of the abstract. The “map” for the changes I suggest looks like this:
A: sentence one
B: sentence five
C: sentence two
D: sentence ten
E: sentences three and four
F: sentences six and seven
G: sentences eight and nine.
One of today’s assignments is to revise our abstracts using this tool, and all of the other useful tools they’ve given us thus far. I am looking forward to seeing the changes in my abstract as a result of this course, and anticipate that future papers will be much easier to write than previous ones. I strongly recommend taking such a course from a good teacher.
Sunday, 21 March 2010
Traveling, again
I am now settled into a hotel room in Zurich, where I will live for the next four days while I attend a scientific writing workshop. It is designed to assist us with every step of the process, from creating a proposal to publication. I am really looking forward to it. While I’m comfortable with the skills required to craft a sentence that says what I meant for it to say, I’m not so comfortable with the process of deciding what parts of an accumulated data set are worth sharing with a general audience—how much is too much, or enough, or not enough? When one knows the flaws in the data, is it still ok to draw some conclusions from it? These are the issues I hope they address this week. However, other students will likely have different needs. It will be interesting to see how it all comes together.
Thursday, 18 March 2010
the mass balance of cookies
Anyone who has ever decided to do lots of baking for a party understands how to look at the various recipes, make note of how much of each ingredient is needed, and then add up the totals for any ingredient which appears in more than one recipe.
Imagine that I decided to make three batches of blond brownies, 2 of oatmeal current cookies, 2 batches of vanilla cookies, and 4 batches of peanut butter cookies. Using the recipes below that would mean that all of the combined cookies would contain a total of 6 cups of oats, 14 cups of flour, 5.5 teaspoons of baking powder, 4.5 teaspoons of salt 1 cup of honey, 4 cups of brown sugar, 2.5 cups of white sugar, 6 cups of butter, 11 eggs, 6 teaspoons of vanilla, 2 cups of peanut butter, 1.5 cups of nuts, 1.5 cups of chocolate chips, 1⅓ cups of currants and 1 teaspoon of cinnamon.
Now, what if I gave you that pile of ingredients, and the recipes, but didn’t tell you how many batches of each one to make, but I did require you to follow the recipes exactly and to use up all of every single ingredient, without wasting anything.
That is what mathmatica is doing for the mass balance calculations. We tell it the starting bulk composition (the list of ingredients), and the recipes (the composition of each mineral that is present, and the list of all the minerals that are present) and ask it how much (how many batches) of each mineral can be made from those ingredients.
I don’t truly understand how it is doing it, but it uses a “monte carlo sampling” to do this. We tell it how many tries to make (100 tries takes only a few seconds) and it tries various combinations of how much of each mineral (how many batches of cookies). I think that it may be comparing the ingredients needed for each of its guesses with the list of ingredients actually present. The larger the number of tries we tell it to make (my boss suggests that it should be at least 1000), the more accurate the results will be.
*******************************
Blond Brownies
1 c. sifted flour
½ t b. powder
½ t b. soda
½ t salt
⅓ c. butter
1 c. brown sugar
1 egg
1 t vanilla
½ c. chopped nuts
½ c. chocolate chips
Sift flour, baking powder, baking soda & salt together. Add nuts and mix well.
Melt butter & add sugar and mix well. Cool. Add eggs & vanilla to butter/sugar and mix well.
Add flour mixture, a small amount at a time, mixing well after each addition. Add chocolate chips and turn into greased pan 9 x 9 x 2 (inches)
Bake at 375 for 20-25 min.
***************************
Oatmeal Current Cookies
Put 2/3 cup of currents into a cup, and cover (just till the liquid shows at the top layer of currents) with a blend of 1/2 apple juice, 1/2 lemongrass tea, put into the microwave on full power for thirty seconds, then let stand till cool.
In one bowl mix:
3 c oats
1 c flour
1 t salt
½ t backing soda
A dash of cinnamon
In another bowl mix till light and fluffy:
1 c soft butter
½ cup light brown sugar
3/4 c raw sugar
1 egg
Add the cooled juice/currents to the butter mixture, and fold in the oat mixture. If too sticky, add a small amount more flour. Roll into 2 – 3 cm balls, place on greased paper, bake at about 180 C for 7 to 10 minutes till they are only barely golden brown. Cool on a wire rack.
Note: I used the juice/tea blend because that is what I put on my muesli in the mornings for breakfast, so I had it on hand. You could use all juice, for a sweeter result, or all tea, for a less sweet result, if you wanted.
**********************************
Vanilla cookies
½ cup butter
½ cup sugar
¼ tsp vanilla
1 egg
2 cups plain flour
1 tsp baking powder
egg or milk for glazing
pinch salt
Preheat oven to 160ºC.
Cream butter sugar and vanilla. Beat egg and add. Add sifted flour and baking powder. knead lightly. Roll out part of the mixture at a time, keeping remainder cool. Cut shapes. Put onto greased pan Glaze with a little egg or milk, dust with cinnamon or Place a piece of cherry or almond on each. Bake 10 minutes to pale gold
********************************
Peanut butter cookies
½ cup butter
½ cup peanut butter (natural style--chunky)
1¼ cups all purpose flour
1/2 cup sugar
¼ cup honey
1 egg
½ tsp baking soda
½ tsp baking powder
½ tsp vanilla
Mix butter and peanut butter well. Add sugar. Add ½ cup of flour, honey, egg,
baking soda, baking powder and vanilla. Beat till thoroughly combined.
Beat in remaining flour.
Shape dough into 1 inch balls. Place 2 inches apart on an ungreased cookie sheet. Flatten with a fork.
Bake in oven at 375 for 7 to 9 minutes or till bottoms are lightly brown.
Cool cookies on a wire rack.
************************************
Tuesday, 9 March 2010
advice to my co-author
* Read the text you’ve written out loud in order to find places with awkward phrasing, unclear sentences, and bad grammar.
* If you do submit a manuscript full of errors and they send you back a review suggesting that there are major problems with the document don’t wait to tell your co-author, who speaks English as a native language, until six days before the revised manuscript is due to be turned in. Properly cleaning up that many problems with a document really takes more time than that.
* Don’t attempt to keep track of citations by hand, use a reliable program designed to keep track of citations for you.
* If you do attempt to do citations by hand, include the list of cited papers when you send the manuscript to your co-author so that she will have something to work with when converting the document to using her citation-tracking program of choice.
* If you attempt to do citations by hand, be consistent in the format you use—do not switch between ALL CAPS for some author names and normal capitalization for others. (Really, one should just use a program to take care of the citations—the time it takes to learn to use one is well rewarded with the consistent results.)
* Once you send the list of references to your co-author, it should actually contain all of the references you cite in the text. Seven references from the first three pages of the document which do not appear on the list is unacceptable. Learn to use a program to keep track of citations!
* It is better to spend the time to get the document into a form of which you can feel proud *before* submitting it to a journal in which you would like it to be published.
* Manuscripts are more concise if you don’t repeat the same thing in slightly different words in the very next paragraph.
* When you need to describe the many different occurrences of minerals within the sample it is helpful to first make a list and organize it, to prevent the paragraphs from wandering, full of needless repetition, and hard to follow.
* Avoid the use of negative phrasings such as “are not uncommon”.
* If the reviewer complains that the figures don’t match the in-text figure references send more than just the first two figures along with the manuscript if you wish your co-author’s help in resolving that issue.
Monday, 8 March 2010
Geospeedometry
Metamorphic rocks form when any preexisting rock is subjected to increased temperatures and/or pressures for sufficient time to grow new minerals which are stable at the new conditions. One very common way for this to occur is for the rock to be taken sufficiently deep below the surface of the earth that both the temperature and pressure are elevated. If it were to happen that a package of rocks were to be taken to such pressures and temperatures and held there until all new minerals grew to replace the original minerals, and then those rocks were to be very slowly brought to the surface so that new minerals continued to grow to replace older minerals during the changing conditions the ultimate result would be a rock which contains only minerals which are stable at surface conditions. However, it happens often that the metamorphic rocks containing minerals which grew at elevated pressure and temperatures are brought back to the surface too quickly for those minerals to be replaced by their lower pressure/temperature counterparts. As a result we have a record of the conditions at which the metamorphism happened. The process of bringing the rocks back to the surface is called “exhumation”, and it refers to great quantities of over-lying rock going away (often due to a combination of faults bring up underlying rocks, and erosion carrying away broken bits of overlying rocks).
Ever since geologists realized that each mineral has a specific range of temperatures and pressures at which it will grow people have been attempting to figure out how to relate the list of minerals present in a given rock with the temperature and pressure at which it formed. The next logical question after the conditions of formation have been determined is one of “how long”. How long did the minerals take to grow? How long (or how quickly) did it take to get this rock from where it formed to the surface of the earth? Those people who study compositional zoning in minerals and calculate the rate of diffusion of atoms within the minerals and who then relate those numbers to the time it took for the diffusion to occur describe what they are doing as “geospeedometry”. Since the term was coined in 1983 there have been 52 papers which list that term in their title, abstract, or key words that have been entered into the Scopus database. One each published in 1983 and 1984, and then a six year break before the next was published. Since 1990 there have been one to five papers on geospeedometry published a year, save for 1993, which didn’t have any.
It is interesting to me that even after completing a PhD and making a point to try to read papers from the geologic literature on a daily basis, I am still encountering terms that are new to me, though they have been around for decades.
Lasaga AC. 1983. Geospeedometry: an extension of geothermometry. In Kinetics and Equilibrium in Mineral Reactions, ed. SK Saxena, Adv. Phys. Geochem., 2:81–114. Berlin: Springer-Verlag
Friday, 5 March 2010
open access journal articles on the tectonics of Chile
Monday, 22 February 2010
How to make cylinders out of salt
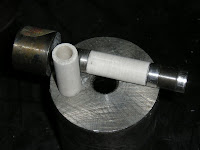
Before I show you how I do that, I'll give you a brief review of our experimental apparatus: The experimental powder is sealed into small (2 mm diameter) gold capsules, which are placed into holes drilled into plugs of MgO (which looks just like a piece of white chalk for a chalk-board, but it contains magnesium instead of calcium). The MgO plug and its contents are placed into graphite cylinders (which we purchase), and the entire package is then put into cylinders of salt. Finally the salt and all of its contents are loaded into a large metal container and placed into the end-loaded piston-cylinder machine, which is what creates the high pressures necessary for our experiments.
Making the salt cylinders is actually kind of fun—it combines classic “science” moments, like using a high-precision scale to measure the ingredients, with serious power tools.
We start with two different types of salt. The “large” grain salt is just the stuff one can purchase in a store to re-fill one’s salt shaker. If you look closely at it you will see that it is comprised of many small cubes of salt. We use a mix of about 2/3 salt powder (obtained by grinding table salt to a fine powder in a coffee grinder (this is very bad for the grinder, and we need to replace them more often than my boss would like to do) with 1/3 of the table salt.
The reason for the blend is so that the different sizes of grains will permit a closer packing than would be possible if everything were exactly the same size. (Try comparing how tightly one can pack marbles or beans into a glass jar if one uses only one size, or two noticeably different sizes). After I carefully measure the requisite amount of salt (just over 5 grams total for these cylinders) I assemble the mold.
The mold is made up of an outer steel cylinder the central hole of which is just over 25 mm in diameter, an internal steel shaft which is 8 mm in diameter, and two end pieces which have holes just large enough into which to insert the shaft, and which are just the correct size to fit within the outer cylinder. One of the two end pieces is in two parts so that the larger end won’t fit into the outer cylinder. The other end piece is a single size so that it can pass entirely through the outer cylinder.
After carefully spraying all parts with a Teflon lubricant, the outer cylinder is placed upon a metal washer upon a sturdy metal platform. Then the small end piece is placed inside, and the steel shaft is placed within that. I then fill it with the salt, using a small rod to tap it down around the shaft and be certain that I’ve eliminated any large air pockets. Once all of the salt is between the outer cylinder and inner shaft, and has been brushed off the end of the shaft the two-part end piece is added to the top.
This is where the power tools come in. Human strength might be enough to push that end piece part way into the hole between outer cylinder and inner shaft, but it would never be enough to cause the salt to recrystallize and adhere to itself and become a single, cohesive mass. Therefore I place the metal platform upon which the filled mold is standing onto the base of the hydraulic press and very carefully align the mold with the pressure rod.
Once everything is positioned exactly correctly I close the door and engage the motor, which forces the pressure rod down, driving the end piece into the outer cylinder, pushing the salt out of its way before it.
When the end piece is fully inserted and the rim is in contact with the cylinder (and before the pressure starts to increase because it can't move any further), I stop the load, retract the pressure rod, invert the entire mold stack, and set it back down without that above mentioned washer (which was used for the sole purpose of causing the smaller end to stick up out of the outer cylinder by a few millimeters after the first end had been inserted).
I then carefully align that smaller end piece with the pressure rod, close the door, and engage the motor to drive the rod down onto the end piece, which pushes the salt from the other direction into the center of the mold. I hold the motor on until the end piece is fully inserted and the pressure dial just starts to rise due to the resistance it is now encountering. Stopping the motor before there is too much pressure is critical—it is possible to do major damage to the mold or the machine (or both) by ignoring the gauge and continuing to apply force after the goal has been achieved.
The salt cylinder now exists, but it is caught fast within the outer cylinder, as are all of the other parts of the mold.
Therefore it is necessary to remove the large metal platform upon which the work has been supported, and set the cylinder over the smaller platform with a hole in the center. Then the pressure rod can once again be lowered, where it will slowly push the salt cylinder, internal metal shaft, and small end-piece down through the outer cylinder, through the hole in the underlying platform into (padded) chamber beneath.
The cylinder is now nearly ready to use. As it comes out of the mold it is just a tiny bit too large to fit into the metal container for the experiments. Therefore we mount the shaft (which is still inside the salt cylinder) into a lathe (after first wrapping both ends with some tape—to protect the metal from the clamp on one end, and to prevent the salt from spinning off the other end).
While the lathe is turning I carefully use a small bit of sand paper to polish the outermost layer of salt off of the cylinder, stopping my work often to check to see if it fits yet.
If I were to sand off too much, I’d need to start the whole process over.