Last week I was introduced to the joys of separating zircon crystals from their host rock so that they can be analyzed with a Laser-ICPMS to determine how old they are (why we’d want to know that may well be the topic of another post one of these days).
I accomplished the first two easiest steps the week before:
(1) Crush rock into small bits with a hydraulic crusher
(2) Put small bits into the ring-mill for five seconds to make sand
On Friday I was taught how to do the next steps. The next few were also reasonably easy:
(3) Put sand into a plastic pan with ridges on one side, add water, shake, and pour off muddy water. Repeat as many times as needed to separate the mud from the sand and wash the mud away.
(4) Add more water, using a back and forth motion, start washing out the lighter weight bits of sand. The zircons, being heavy for their size, sink to the bottom of the pan with a few other heavy minerals. Repeat this step till most of the sand has been washed away, being careful not to disturb the area at the bottom of the pan where the heavy stuff is collecting. (Note: this process is done over a tub, so that the sand is collected, and *not* washed down the sink! Not only is this better for the plumbing, but if accidents happen and you wash away everything, you can start over with step three, and not have to go crush a new bit of rock. This can be very important, if the sample comes from *A Long Way Away* or you have *A Limited Suply*.)
(5) Now that there is just a little (~ 2 tablespoons worth) of sand left (of the ~2 cups of starting material) carefully submerge the pan into some clear water and tilt and shake to get most of the rest of the large, light weight, grains to separate out from the tiny, heavy, grains.
(6) Carefully pour the tiny bit of remaining sand into the tiny glass plate (~ 5 cm wide) and use the same sort of panning technique as you've been using, only scaled down, to make the heavy grains sink to the bottom, and wash away the last of the light weight grains.
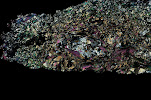
(7) Check it, using a microscope--yup, some of the remaining grains are zircon! You can tell because of the bright colours it has due to birefringence under the crossed polar lenses of the microscope. (See: a particularly stunning example of these sorts of colours.)
(8) Set the glass plate into the oven to dry for half an hour
(9) Carefully, with a very, very clean brush, put the remaining sand (about 1/4 teaspoon worth) onto a sheet of paper. Set another sheet of paper around the outside of a magnet, and pass it over the sand at a distance of ~1.5 cm to draw off anything which is strongly magnetic
(10) Remove the paper from the magnet, set aside the grains thus collected, and put clean paper on the magnet. This time pass it over the sand just above the grains, to draw off the moderately magnetic stuff.
(11) Remove the paper from the magnet, set aside the grains thus collected, and put clean paper on the magnet. This time actually touch the sand with it, to draw off everything that is weakly magnetic. This leaves you with a *very* tiny pile of very tiny grains of zircon and anything else in your sample which is small enough, heavy enough, and non-magnetic enough to have survived the cleaning ritual.
(12) Prepare the zircon mount by cleaning two glass plates. Put a sheet of special double-sided tape onto one of them, remove the cover-paper, then set the ring-mould on that and trace a circle onto the tape, and add lines bisecting the circle at right angles to one another to mark the center of the circle.
Now the truly difficult part begins:
(13) Carefully sprinkle a small amount of the zircon containing sand onto the plain glass plate and look at it under the microscope set up with crossed polars so that they zircons can be distinguished from the non-zircons. The non-zircons in this sand are either dark or white in crossed polarized light, not brightly coloured like in the link above.
(14) using a clean, specially prepared paint brush, which has most of its bristles cut off to tiny nubs, and one single hair which sticks out from the rest by 3 or 4 mm, carefully pick up one zircon at a time from the clean glass plate and transfer it to the center region of the tape-covered glass plate.
That *sounds* ever so much easier than it is! First of all, the microscope with which we are looking at the zircons on the clean glass plate is a standard one, which means what you see through the scope is both upside down and backwards. It is also needful to use the 20-times magnification lens to be able to see the zircons, since they are so tiny. This makes it difficult to even get that single hair into the field of view in the first place, and it is ever so much harder to actually move it the direction it needs to go to touch the zircon grain once you've found it. In addition, the thing which makes the part about "pick up" the crystal possible is either static electricity (rub the brush against your hair for a bit) or saliva (lick the brush)--either of which is a limited-time-only phenomena--if you take too long getting that hair into place, the grain isn't going to stick to it!
I soon found out that since I am not practiced at this skill I had a choice. I could *either* touch the zircon at which I was aiming, *or* I could pick up one (or often, many) random grain(s) with the hair. I could not manage both at once! So I contented myself with aiming at specific zircons, picking up grains of *something*, and transferring them over to the tape-covered glass plate, and trying again.
Anyone else out there in the geoblog sphere have any experience with this? Would such a thing be easier?


3 comments:
Min sep! ... oh joy!
When I did it a few years back we had this process:
(1) crush
(2) grind
(3) Gemeni table
(4) vertical Frantz (magnet)
(5) slope Frantz
(6) heavy liquid #1
(7) heavy liquid #2
(8) pick
This post and this follow-up post from Thermochronic at the blog Apparent Dip goes into tons of details.
Good luck ... it's a good feeling when it's all separated and ready for analysis.
Thanks for sharing the links, I missed those when they came out. It sounds like our lab is way low tech compared to some--it was a bog-standard ribbed gold pan that I used, and a hand-held magnet. I also haven't had to go near any heavy liquids.
I've never done separates for zircons - it sounds quite complicated - but I have done a bunch of magnetic separations followed by various heavy liquid separations. I don't remember what it was all for - and I was just a young junior-geologist flunky in the lab!
Post a Comment