Monday, 22 February 2010

How to make cylinders out of salt

One of the necessary steps in preparation for running my experiments is creating cylinders out of salt.

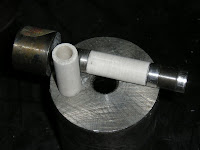
Before I show you how I do that, I'll give you a brief review of our experimental apparatus: The experimental powder is sealed into small (2 mm diameter) gold capsules, which are placed into holes drilled into plugs of MgO (which looks just like a piece of white chalk for a chalk-board, but it contains magnesium instead of calcium). The MgO plug and its contents are placed into graphite cylinders (which we purchase), and the entire package is then put into cylinders of salt. Finally the salt and all of its contents are loaded into a large metal container and placed into the end-loaded piston-cylinder machine, which is what creates the high pressures necessary for our experiments.


Making the salt cylinders is actually kind of fun—it combines classic “science” moments, like using a high-precision scale to measure the ingredients, with serious power tools.

We start with two different types of salt. The “large” grain salt is just the stuff one can purchase in a store to re-fill one’s salt shaker. If you look closely at it you will see that it is comprised of many small cubes of salt. We use a mix of about 2/3 salt powder (obtained by grinding table salt to a fine powder in a coffee grinder (this is very bad for the grinder, and we need to replace them more often than my boss would like to do) with 1/3 of the table salt.

The reason for the blend is so that the different sizes of grains will permit a closer packing than would be possible if everything were exactly the same size. (Try comparing how tightly one can pack marbles or beans into a glass jar if one uses only one size, or two noticeably different sizes). After I carefully measure the requisite amount of salt (just over 5 grams total for these cylinders) I assemble the mold.

The mold is made up of an outer steel cylinder the central hole of which is just over 25 mm in diameter, an internal steel shaft which is 8 mm in diameter, and two end pieces which have holes just large enough into which to insert the shaft, and which are just the correct size to fit within the outer cylinder. One of the two end pieces is in two parts so that the larger end won’t fit into the outer cylinder. The other end piece is a single size so that it can pass entirely through the outer cylinder.

After carefully spraying all parts with a Teflon lubricant, the outer cylinder is placed upon a metal washer upon a sturdy metal platform. Then the small end piece is placed inside, and the steel shaft is placed within that. I then fill it with the salt, using a small rod to tap it down around the shaft and be certain that I’ve eliminated any large air pockets. Once all of the salt is between the outer cylinder and inner shaft, and has been brushed off the end of the shaft the two-part end piece is added to the top.


This is where the power tools come in. Human strength might be enough to push that end piece part way into the hole between outer cylinder and inner shaft, but it would never be enough to cause the salt to recrystallize and adhere to itself and become a single, cohesive mass. Therefore I place the metal platform upon which the filled mold is standing onto the base of the hydraulic press and very carefully align the mold with the pressure rod.

Once everything is positioned exactly correctly I close the door and engage the motor, which forces the pressure rod down, driving the end piece into the outer cylinder, pushing the salt out of its way before it.


When the end piece is fully inserted and the rim is in contact with the cylinder (and before the pressure starts to increase because it can't move any further), I stop the load, retract the pressure rod, invert the entire mold stack, and set it back down without that above mentioned washer (which was used for the sole purpose of causing the smaller end to stick up out of the outer cylinder by a few millimeters after the first end had been inserted).


I then carefully align that smaller end piece with the pressure rod, close the door, and engage the motor to drive the rod down onto the end piece, which pushes the salt from the other direction into the center of the mold. I hold the motor on until the end piece is fully inserted and the pressure dial just starts to rise due to the resistance it is now encountering. Stopping the motor before there is too much pressure is critical—it is possible to do major damage to the mold or the machine (or both) by ignoring the gauge and continuing to apply force after the goal has been achieved.

The salt cylinder now exists, but it is caught fast within the outer cylinder, as are all of the other parts of the mold.

Therefore it is necessary to remove the large metal platform upon which the work has been supported, and set the cylinder over the smaller platform with a hole in the center. Then the pressure rod can once again be lowered, where it will slowly push the salt cylinder, internal metal shaft, and small end-piece down through the outer cylinder, through the hole in the underlying platform into (padded) chamber beneath.

The cylinder is now nearly ready to use. As it comes out of the mold it is just a tiny bit too large to fit into the metal container for the experiments. Therefore we mount the shaft (which is still inside the salt cylinder) into a lathe (after first wrapping both ends with some tape—to protect the metal from the clamp on one end, and to prevent the salt from spinning off the other end).

While the lathe is turning I carefully use a small bit of sand paper to polish the outermost layer of salt off of the cylinder, stopping my work often to check to see if it fits yet.


If I were to sand off too much, I’d need to start the whole process over.


Thursday, 18 February 2010

Continuity

The theme for this month’s Scientiae Carnival is Continuity. This is an appropriate topic for geologists; the theme appears over and over again in our science. Sedimentary geologists have their unconformities marking places where processes failed to display continuity. Metamorphic petrologist look for clues in the chemical zoning of minerals to see if the changes their rock underwent were from one episode of deformation, or if the region had no continuity and has suffered multiple deformational episodes.

But what does the word mean on a personal level? Particularly for one such as myself who leads an odd sort of nomadic existence (moving every 1 to 3 years to a new location, then staying put for a while before moving again). In some ways one could say that my life lacks continuity—by deliberately changing my home base every few years I am denying myself the sort of stability and continuity that people who spend their entire life in one town take for granted. On the other hand, I am able to bring with me certain things which maintain the level of continuity I require for my own comfort levels. As an avid reader, and re-reader of books my library travels with me. (Sure it is expensive to ship books, but more expensive to replace them!) No matter where I am, at any time I feel the need for emotional comfort I can pick up an old favorite book and be transported to a setting that I know and love, and can watch as the characters once again solve the problems that they face.

Another place I find continuity is in my love of historical reenactment. Having joined a historically themed organization back when I was in highschool I am guaranteed to find friends waiting for almost anywhere I move who share similar interests to my own. After so many years playing that game I find that no matter where I go I have friends in common with new people I meet via that organization.

The third type of continuity in my life is the familiarity of the academic environment. While no two universities are (or should be) the same, still there is an atmosphere in every geology department I’ve ever entered. There is something about hallways filled with displays of rocks and minerals and geologic maps that is inspiring, comforting, and pretty, all at once. I took a number of years off between completing my master’s and starting my PhD program, during which time I worked as a massage therapist, rather than doing science. When I was first considering going back for the PhD I visited the University, and just walking through the hallway, looking at their display made me feel like I’d come home, and I knew, beyond a shadow of a doubt, that academia was where I wanted to be, and that geologic research was what I wanted to be doing.

Wednesday, 17 February 2010

I couldn’t help myself

This morning one of my friends posted as her facebook status update the comment "Tell me something I don't know..." "Without mucus, your stomach would digest itself." "Ok, tell me something ELSE I don't know. Something less... disgusting...".

Since she isn’t a geologist, I couldn’t resist typing up the following paragraph to share with her, as something she (and, likely, most of her other on-line friends) probably didn’t already know.

The presence of even a small amount Mn lowers the temperature at which garnet first starts to crystallize in a metapelitic rock; Mn is preferentially incorporated into garnet as compared to the other minerals. It substitutes into the same position in the garnet crystal structure as Fe, Ca and Mg (all of which are usually far more common). As a result the earliest garnet grown in a metamorphic rock is usually the highest in Mn-concentration, and as the crystal grows and depletes the reservoir of Mn its composition changes, gradually incorporating less and less Mn and more and more Fe into its crystal structure. The analysis of a typical crystal of garnet in such rocks will usually show a bell-shaped curve for Mn—decreasing in quantity towards the edges of the grain, while Fe increases. (Ca and Mg are also usually zoned, but they tend to respond more to changes in pressure to dictate which has the greater concentration.)

Sunday, 14 February 2010

filling in the gaps

One of the biggest disadvantages of having taken off a number of years between my Masters and PhD projects is that I had time to forget much of what I had learned in the way of mathematics and its application to the other sciences (use it or lose it!). As a result I have found myself skipping over the formulas and calculations presented in many of the papers I’ve read. This is, of course, a very bad habit, because if one doesn’t think about what those various symbols mean one doesn’t understand what the author of the paper was attempting to communicate.

Sometimes the text contains enough detail that one can manage without that bit of information; other times they let the equation stand alone as the most precise way to express the relationships in question. One solution I’ve used in the past to help understand equations given in a paper is to create an Excel spreadsheet in which I can set up formulas which point to other cells into which I can enter their numeric data to see if I can get the formulas to yield the same results that the authors reported.

However, this technique doesn’t lend itself very well to understanding general equations for which we have no actual numbers to substitute into the equations to solve them. Today I decided to set up a Word document to help me dissect and understand the formulas. The format I’ve decided upon is to use the Outline view mode with the first rank of the outline giving the name/number of the equation and the source paper in which I found it (e.g. Equation (2) from (Tirone and Ganguly, 2010*). Then, below that heading I add a paragraph which gives the equation (e.g. ri = k1√D(t-tn(i))). Below that I add a series of level-two headers for (1) what the equation means in plain English (e.g. “The crystal radius is equal to the quantity of a dimensionless constant times the square root of the coefficient of intergranular diffusion through the matrix of the growing crystal times the amount of time which has elapsed since the crystal started growing.”) followed by (2) a “because” header which lists the definition of each of the variables

In this example:

r = crystal radius

i = specific (growing) crystal in question

k1 = a dimensionless constant

D = coefficient of intergranular diffusion through the matrix of the growing crystal (i)

t = time

tn(i) = the nucleation time of the crystal

Followed by (3) a summary of what one would use the equation to do (e.g. Calculate the relationship between the size of the crystals and how long it took them to grow.)

Setting this up and filling it in for the equations I’ve encountered in today’s 1000 words of geologic literature has really underscored my need to refresh my memory about basic chemistry. The equation (3) from the same paper as the above example was no where near as easy to fill in, because the authors first stated “The diffusion coefficient is expressed as a function of temperature according to the Arrhenius relation D=Doexp(−E/RT)” after which they gave a new equation created by substituting the Arrhenius equation into their equation (2). In the text which followed they did not define any of the new terms which come from the Arrhenius equation. Presumably because the reader is assumed to already be familiar with said equation.

Therefore I took down my undergraduate Chemistry text book and looked up the Arrhenius equation. I found it necessary to read a couple of sections leading up to that equation as well as the section in which it is introduced in order to feel like I understood what the textbook was describing. Next I will need to figure out how the version of the equation the authors of the paper presented relates to the version in my textbook.

Is any of this really necessary? Could I just go through life not really understanding the equations I see and just jump to the part of the article where the authors describe what the results of their calculations mean? Perhaps I could. However, I think I will be a better scientist as a result of my going back and filling in these gaps in what I retained from my undergraduate education as I find them.

*Tirone, M. and Ganguly, J. (in press (downloaded Feb 2010)). "Garnet compositions as recorders of P-T-t history of metamorphic rocks." Gondwana Research.

Saturday, 13 February 2010

more rocks seen whilst at the short course

On Thursday afternoon I made a bit of time to do a longer walk around Verbania. In the course of the walk I found a variety of other locations wherein retaining walls were built upon outcrop, giving a good idea of how much material must have been removed in order to put in the roads. I like the way the bottom of the wall changes with the underlying ground, but the top stays smooth.


I also found a few places where the houses themselves had been built directly onto outcrop.


The view from the docks includes islands, birds, and mountains just showing through the haze of the day.


Noteworthy bits of stone architecture included an impressive gateway,


a cute little house that seems to have grown out of the hill,


and a lovely old stone house, all of which made good use of the local schist.


As we made our way home on Friday, I stopped to take a photo of the quarry by the train station (about 6 or 7 km from the point upon which the town is centered. I strongly suspect that this is the source of the lovely igneous rock which made up the walls in my last post.


Wednesday, 10 February 2010

the geology at Chiesa di San Remigio

One of the highlights of spending a week in Verbania for the Short Course is the short walks I’ve done during our breaks between lectures. So far my favorite attraction is the Chiesa di San Remigio, a beautiful 11th Century church on the ridge above the school/hotel where the course is taking place. As one wanders up the hill towards the church one reaches a place where the stone wall along the side of the road changes from a blocky, quarried, igneous rock sitting upon the road bed to a place where the wall rests upon outcrop of some nicely folded schist, and the wall is comprised of primarily very local stone—both round river rocks, and platy bits of the local schist.


On my first walk up the hill the outcrop got my attention, and my feet led me ever up, wondering what would be next.

I was truly delighted when I reached the top of the road and discovered the little stone church.


Like the stone fence above, is also built directly in contact with the folds of the schist.


Since discovering this delightful location on Monday, I have made a point of returning each day, and each time I discover new interesting rocks amongst the building stone. Today a small group of us went up, and we crawled all over the foundations looking at the rocks (as you do in such locations).

One particularly cute rock is so garnet-rich it is nearly pink. However, while I have searched carefully, I have yet to find any others of that sort, so suspect that the river and/or glacier (the lake is clearly a filled glacier valley) which carried it here brought it from quite a long way away.


The only other rock with visible garnets in it that I saw was this one with the lovely stretched quartz.


However, I did find a good-sized garnet in the mortar


I like the way the different stones were used as embellishment.


As were some spare bricks they had lying around.


I have often said that I’d like to live in a castle, but would settle for an old stone church. However, until this trip, I’d never actually met an old stone church in a location in which I’d want to live. This place, despite the density of houses in the village, is one in which I would be happy to live. The view from the church is just as amazing as the rocks of which and upon which it was built.


day two of the short course

I really enjoyed today’s lectures. The morning was a talk on the Dissolution-Reprecipitation During Melt-Rock Interaction in Partially Molten Silicates. It was very well organized and presented, and included movies showing the changes in composition of the crystals and melt during the reactions between them. It is amazing how much easier the topic is to follow when there are movies involved—the last time I would have had classes on melt-crystal interactions of any sort would have been in the early 1990’s when diagrams were still drawn on the board by hand during lectures. It worked (and gave us time to copy them in our notes), but seeing them change (and having a copy of the powerpoint presentation and movies to refer to later) is ever so much better.

During the short coffee break between lectures I went for a walk up the hill, and was delighted to see the lovely stone church at the end of the road. It is built out of an igneous (dolerite by the look of it, though I didn’t actually check proportions of various minerals to confirm or deny that identification) on an out crop of nicely folded schist. In a few places there are layers of the schist incorporated into the building, the thin stones stacked at an angle to the main blocky building stones, in a very nice effect. As soon as I’m home and once again have the cable for my camera I’ll share photos.

The second talk of the morning was on Microstructural Modeling with ELLE—Introduction and Applications. It was also well organized and presented—starting with the answer to the question “Why do numerical modeling at all?” (Because geologic processes operate on way too many scales, ranging from fractions of a μm to 1000’s of km, and from fractions of a second to many million years, and models can handle all of these scales, but experiments are limited in how much time is available and how large of a sample they can operate on, and field work isn’t always enough to show how the rocks achieved their current configuration.)
After lunch we spent some time playing with our own copies of Yan’s movies, and then we started learning how to use ELLE. We were only able to brush the surface of what is possible with this, but with the tools he’s given us, and access to their forum, anyone who is keen should be able to take this information and run with it.

Monday, 8 February 2010

off to a short course

I am currently spending the week in Verbania, Italy, attending a short course on Microstructures and Physico-Chemical Properties of Earth and Planetary Materials. I am pleased to be here for a number of reasons. Not only is the topic of the course interesting, but the location is beautiful. The town is nestled between a large lake and some mountains. The views across the lake are lovely, and the view of the town against the hills as seen on the approach is very nice. I arrived on Sunday afternoon, taking the hotel shuttle the 7 km from the train station with a group of other attendees. Most of the people in our carload had travelled here from overseas—several from Brazil, and one from the US.

This is a very international group. While the majority of attendees are from Italy, the list includes Lithuania, Germany, France, Belgium, Switzerland, Ireland, Norway, Brazil, Mexico, USA, and Korea. As a result of the mix, despite being held in Italy, the lectures are all in English, for which I, as one of those people who still suffers from mono-linguistics, am grateful.

This morning started with lectures on the Microstructural Evolution in Materials Science, taught by someone in the Materials Science field. As a metamorphic petrologist, it was interesting to see him talking in terms of phase diagrams wherein one changes from a single phase to a double phase field due to *cooling*, rather than in response to heating. He is also accustomed to not considering effects due to pressure, since materials science tends to focus on processes which happen at surface temperature and pressure. Nonetheless, most of the information he provided us apply to geological systems as well.

After morning coffee break the next lecture was on the topic of Estimation of Anisotropic Physical Properties of Aggregates with Preferred Crystal Orientation with Applications to Seismic Anisotropy. This lecture was very, very heavy in math and formula, but it was supplemented by the occasional photograph of real samples, both in thin section, and in images made by TIM.

We then had a break for the very elaborate lunch served by the hotel, followed by an afternoon devoted to practical sessions on both morning topics (plus supplementary lectures). I've had to leave the room to go download a program I didn't know I needed, which is why I've got a moment to post this, which was written during an earlier break.